
CIRCULAR SAW MAINTENANCE
Changing a circular saw blade is a straightforward job, but it puts your hands close to sharp teeth and the saw’s arbor. The safest approach is to disconnect the saw from power first, use the spindle lock correctly, note the blade’s rotation direction, and make sure the arbor bolt and washers go back exactly as your saw manufacturer specifies.

Before You Change the Blade

Do not begin with the saw connected to power. For a cordless circular saw, remove the battery completely. For a corded saw, unplug it from the outlet. Simply releasing the trigger or engaging a trigger lock is not a substitute for disconnecting the power source. OSHA’s handheld saw safety guidance also emphasizes blade guarding and safe operation around portable saws.
Place the saw on a stable surface with enough room to work. If the saw has just been used, allow the blade to cool before touching it. Wear suitable eye protection and consider work gloves while handling the blade itself, while remembering that gloves should never be worn around a powered, rotating blade.
If this is your first time working with the tool, our beginner’s guide to using a circular saw covers the main controls, setup, cutting technique, and kickback precautions.
What You’ll Need
- The correct replacement circular saw blade
- The arbor or blade wrench supplied with the saw, or the manufacturer-specified tool
- The saw’s instruction manual
- Eye protection
- A stable, well-lit work surface
Do not substitute an ill-fitting wrench or force the arbor hardware with improvised tools. Damaging the bolt or spindle can turn a routine blade change into a repair.
How to Choose the Correct Replacement Blade
Before removing anything, confirm that the new blade is compatible with your saw. Check the blade diameter, arbor or bore size, maximum permitted speed, and the material the blade is designed to cut. The blade must also be suitable for the saw’s intended application.
Tooth count matters for cut characteristics, but compatibility comes first. Never install a blade merely because it physically fits over the arbor. Follow the circular saw and blade manufacturers’ specifications. If you’re still choosing the saw itself, see our best circular saws guide.
How to Change a Circular Saw Blade Step by Step
Step 1: Disconnect the Saw From Power
Remove the battery from a cordless saw or unplug a corded model. Confirm that the trigger cannot start the saw before putting your hands near the blade.
Step 2: Find the Spindle Lock
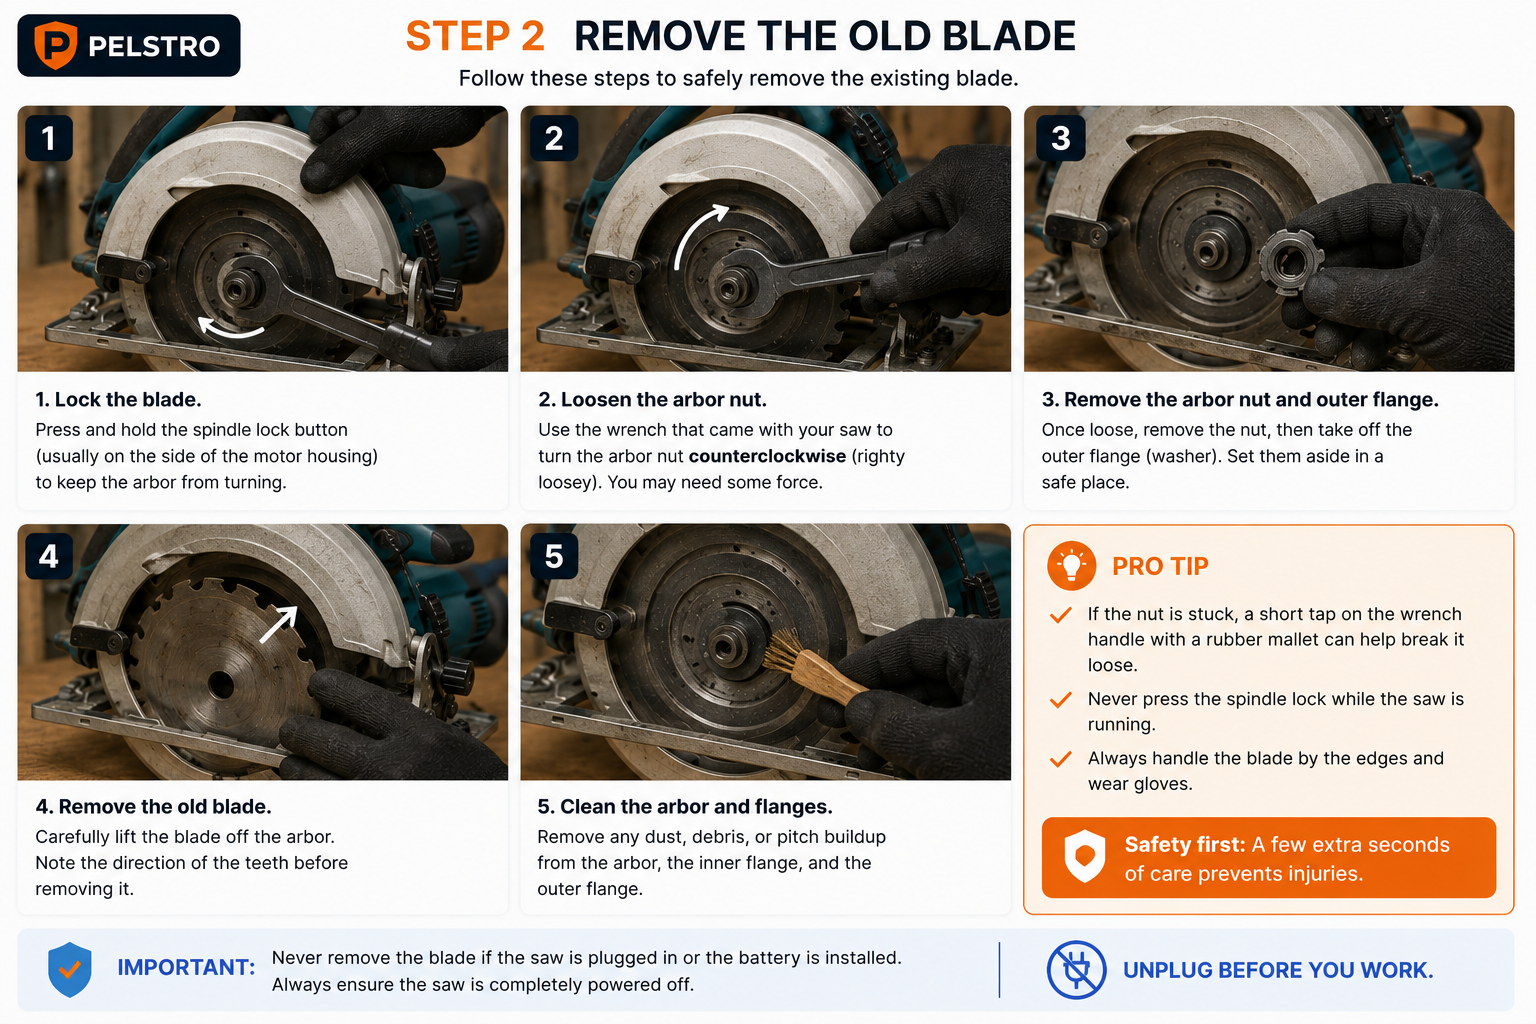
Locate the spindle-lock button on your saw. Its position varies by model. Pressing it prevents the spindle from rotating so the arbor bolt can be loosened.
Rotate the blade carefully by hand until you feel the spindle lock engage fully. Do not operate the saw with the spindle lock pressed.
Step 3: Note the Blade Direction
Before removing the old blade, look for the rotation arrow on the saw’s blade guard or housing and compare it with the arrow printed on the blade. Taking a quick photo can also give you a useful reference during reassembly.
Do not rely only on which way the printed label faces. The correct orientation is determined by the saw’s rotation direction and the blade manufacturer’s markings.
Step 4: Loosen the Arbor Bolt
Keep the spindle lock engaged and place the correct wrench on the arbor bolt. Loosen it in the direction specified by your saw’s manual. Arbor-bolt thread direction is not identical on every circular saw, so do not assume that every model loosens the same way.
Step 5: Remove the Arbor Hardware
Once loose, remove the bolt and any outer washer or flange that must come off to release the blade. Pay attention to the order and orientation of each part. Put the hardware somewhere clean so nothing is lost.
Step 6: Retract the Lower Blade Guard
Use the guard lever to retract the lower guard only as much as needed to remove the blade. Keep your fingers away from the teeth and do not modify, tie back, or disable the guard.
Step 7: Remove the Old Blade
Carefully slide the blade off the arbor and out through the opening in the guard. Hold it by the center and edges where practical rather than gripping the teeth.
Step 8: Inspect the Arbor and Guard Area
With the blade removed, check for obvious damage, packed sawdust, or debris around the arbor and guard mechanism. Clean loose debris using a method approved by the manufacturer. Do not introduce lubricants or cleaners where the manual does not permit them.
Step 9: Install the New Blade in the Correct Direction
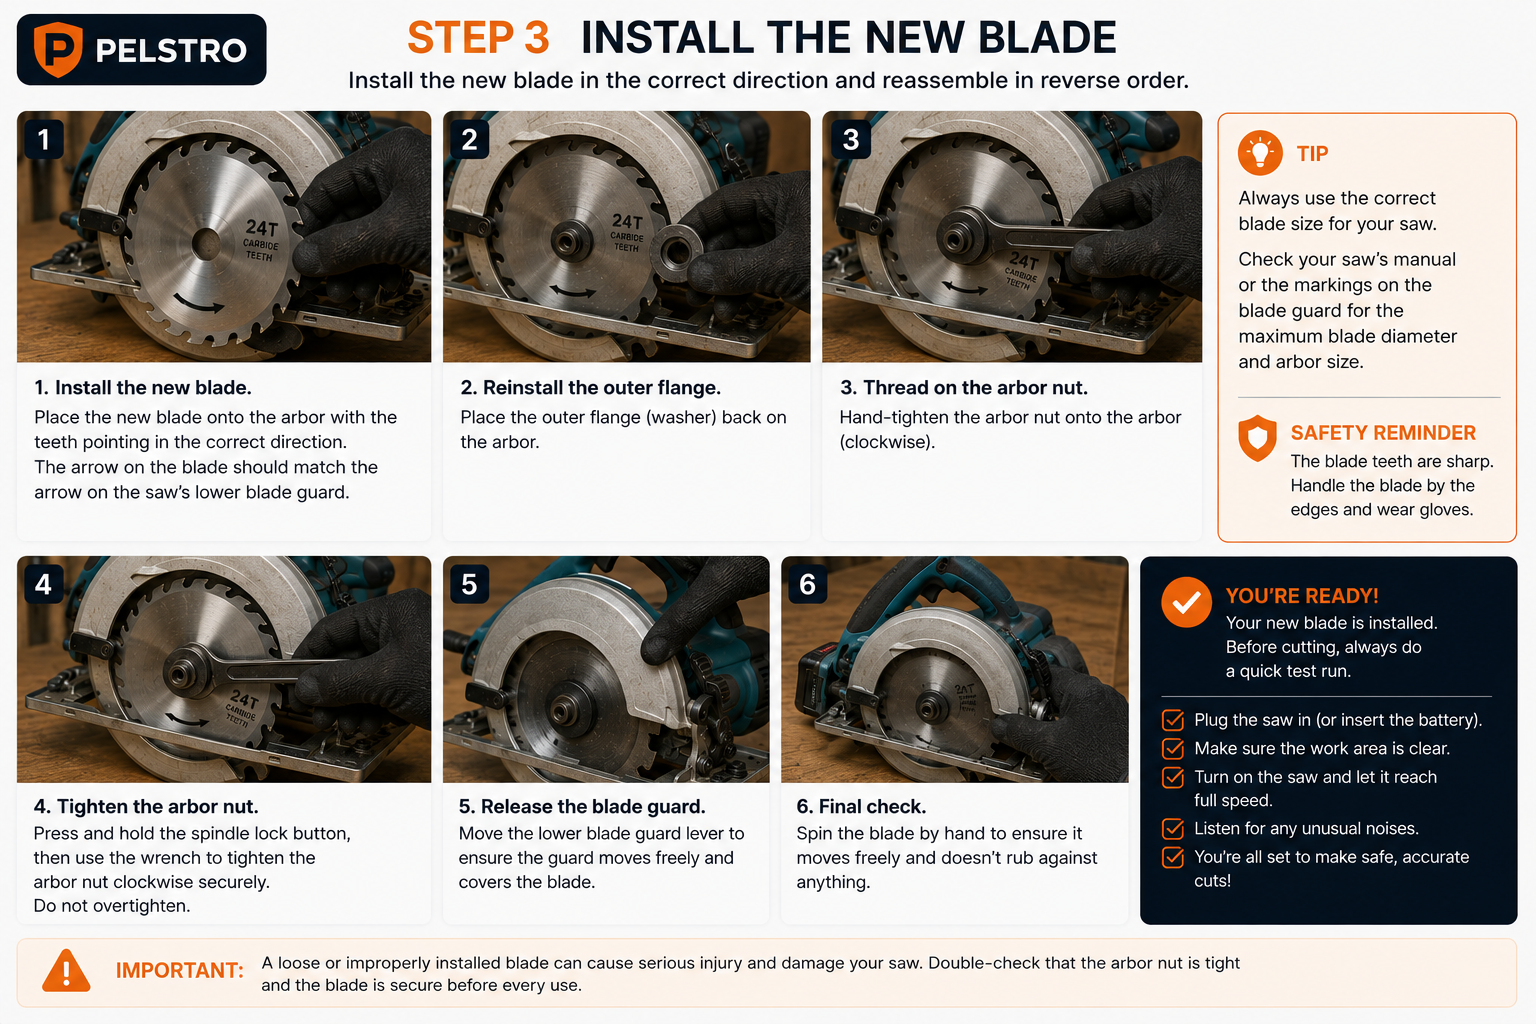
Match the rotation arrow on the replacement blade to the direction indicated on the saw. Slide the blade fully onto the arbor and make sure it seats flat rather than resting crooked against a flange or washer.
Step 10: Reinstall the Washer and Arbor Bolt
Replace the flange, washer, and bolt in the same order and orientation specified by the manufacturer. Thread the bolt by hand initially when possible so you can detect cross-threading before applying force.
Step 11: Tighten the Arbor Bolt
Engage the spindle lock and tighten the bolt securely using the supplied or specified wrench and the direction and procedure in your manual. Do not add a long extension or use an impact driver unless the manufacturer specifically instructs you to do so.
Step 12: Check the Blade and Guard
Before reconnecting power, rotate the blade carefully by hand to confirm that it turns freely and does not wobble or rub unexpectedly. Release the lower guard and make sure it returns smoothly and fully covers the blade as designed.
Which Way Should a Circular Saw Blade Face?
The safest answer is to follow the rotation arrows rather than a universal rule about labels or tooth appearance. Match the arrow on the blade with the direction of rotation indicated on the saw or in its manual.
On many handheld circular saws, the teeth at the bottom of the blade move upward through the workpiece, but saw designs differ and this observation should not replace the manufacturer’s markings. If the arrows are unclear, stop and consult the manual for your exact model.
How Tight Should the Arbor Bolt Be?
The arbor bolt should be tightened according to the saw manufacturer’s procedure. It needs to be secure, but excessive force is not an improvement. Using extensions, impact tools, or excessive leverage can damage the bolt, flange, spindle lock, or threads.
If your manual provides a torque specification, follow it with an appropriate tool. Otherwise use the supplied wrench and the stated tightening procedure.
When Should You Replace a Circular Saw Blade?
A blade may need replacement when it is damaged, has missing or chipped teeth, is warped, produces increasingly poor cuts despite correct setup, or no longer performs appropriately for its intended material. Burning, excessive effort, and rough cuts can also indicate a dull or unsuitable blade, although feed rate, alignment, material, and saw setup can contribute too.
Never continue using a blade that is cracked, visibly warped, or otherwise damaged. If you are uncertain whether a blade remains safe to use, replace it with a compatible blade rather than taking the risk. For projects where you’re deciding which cutting tool is more appropriate, our circular saw vs jigsaw comparison explains where each tool works best.
Common Circular Saw Blade-Change Mistakes
Leaving the Battery Installed
A cordless tool is still capable of starting while the battery is attached. Remove it before touching the blade or arbor hardware.
Guessing the Arbor Bolt Direction
Not every saw uses the same thread arrangement. Check the manual rather than applying more force when the bolt seems unusually tight.
Installing the Blade Backward
Use the rotation arrows on the blade and saw. Do not use the printed label as your only orientation reference.
Losing Track of Washers or Flanges
These parts position and clamp the blade. Keep them in order and reinstall them exactly as specified.
Using the Wrong Blade Size
A blade that is too large, has the wrong arbor size, or exceeds the saw’s specifications can be dangerous. Compatibility must be confirmed before installation.
Overtightening the Arbor Bolt
More force is not necessarily safer. Use the correct wrench and follow the manufacturer’s tightening instructions.
Forgetting to Check the Lower Guard
After installation, confirm that the lower guard moves freely and springs back into its protective position before reconnecting power.
A blade change may improve a plywood setup without replacing the saw. Our plywood saw buying guide explains blade and support considerations, while the track saw vs circular saw comparison covers guide-system choices.
Circular Saw Blade-Change Safety Tips

- Disconnect power completely. Remove the battery or unplug the saw before beginning.
- Handle blade teeth carefully. A stationary carbide-tipped blade can still cause a serious cut.
- Use only compatible blades. Diameter, arbor size, speed rating, and intended material all matter.
- Use the correct wrench. Avoid makeshift tools that can slip or damage the hardware.
- Never defeat the blade guard. Retract it only as required during the blade change and confirm that it returns freely.
- Do not guess when something feels wrong. If the bolt, flange arrangement, blade orientation, or spindle lock differs from this general process, follow your saw’s manual.
Frequently Asked Questions
Do I need to remove the battery before changing a circular saw blade?
Yes. Remove the battery from a cordless circular saw before changing the blade. For a corded saw, unplug it from the power source.
Why won’t my circular saw blade bolt loosen?
Make sure the spindle lock is fully engaged and that you are turning the bolt in the loosening direction specified for your exact saw. If it remains stuck, consult the manufacturer’s instructions rather than increasing force blindly.
Can I use an impact driver to remove a circular saw blade?
Do not use an impact driver unless the saw manufacturer specifically approves that method. The impact action can apply much more force than necessary and may damage arbor components or make correct tightening difficult.
Can I put any circular saw blade on my saw?
No. The blade must match the saw’s specifications, including diameter, arbor size, speed rating, and intended application.
Should the circular saw blade label face outward?
Do not use label position as the deciding rule. Follow the rotation arrow on the blade and match it to the saw’s indicated rotation direction.
Should I test the saw after changing the blade?
Before powering the saw, first perform the manual checks described above. Once everything is correctly assembled and the work area is clear, follow your manufacturer’s procedure for returning the saw to service. Stop immediately if you notice abnormal vibration, wobble, rubbing, or noise.
The Pelstro Bottom Line
A safe circular saw blade change comes down to a few non-negotiable habits: disconnect the power, use the spindle lock and correct wrench, follow the rotation arrows, preserve the original washer and flange arrangement, and verify the lower guard before reconnecting power. Do not rush a stuck arbor bolt or guess at blade orientation; your saw’s manual takes priority whenever its procedure differs from general guidance.
Need more help? Continue with our How to Use a Circular Saw guide.
Pingback: How to Maintain Your Power Tools: A Complete Beginner’s Guide - Pelstro
Pingback: How to Store Power Tools Properly: A Complete Guide - Pelstro