
CIRCULAR SAW BASICS

Learning how to use a circular saw starts with good setup. Choose the correct blade, set the cutting depth for the material, support the workpiece properly, and know exactly where the blade will travel before you pull the trigger. Once those basics are right, straight and accurate cuts become much easier.
How to Use a Circular Saw: Know the Basics
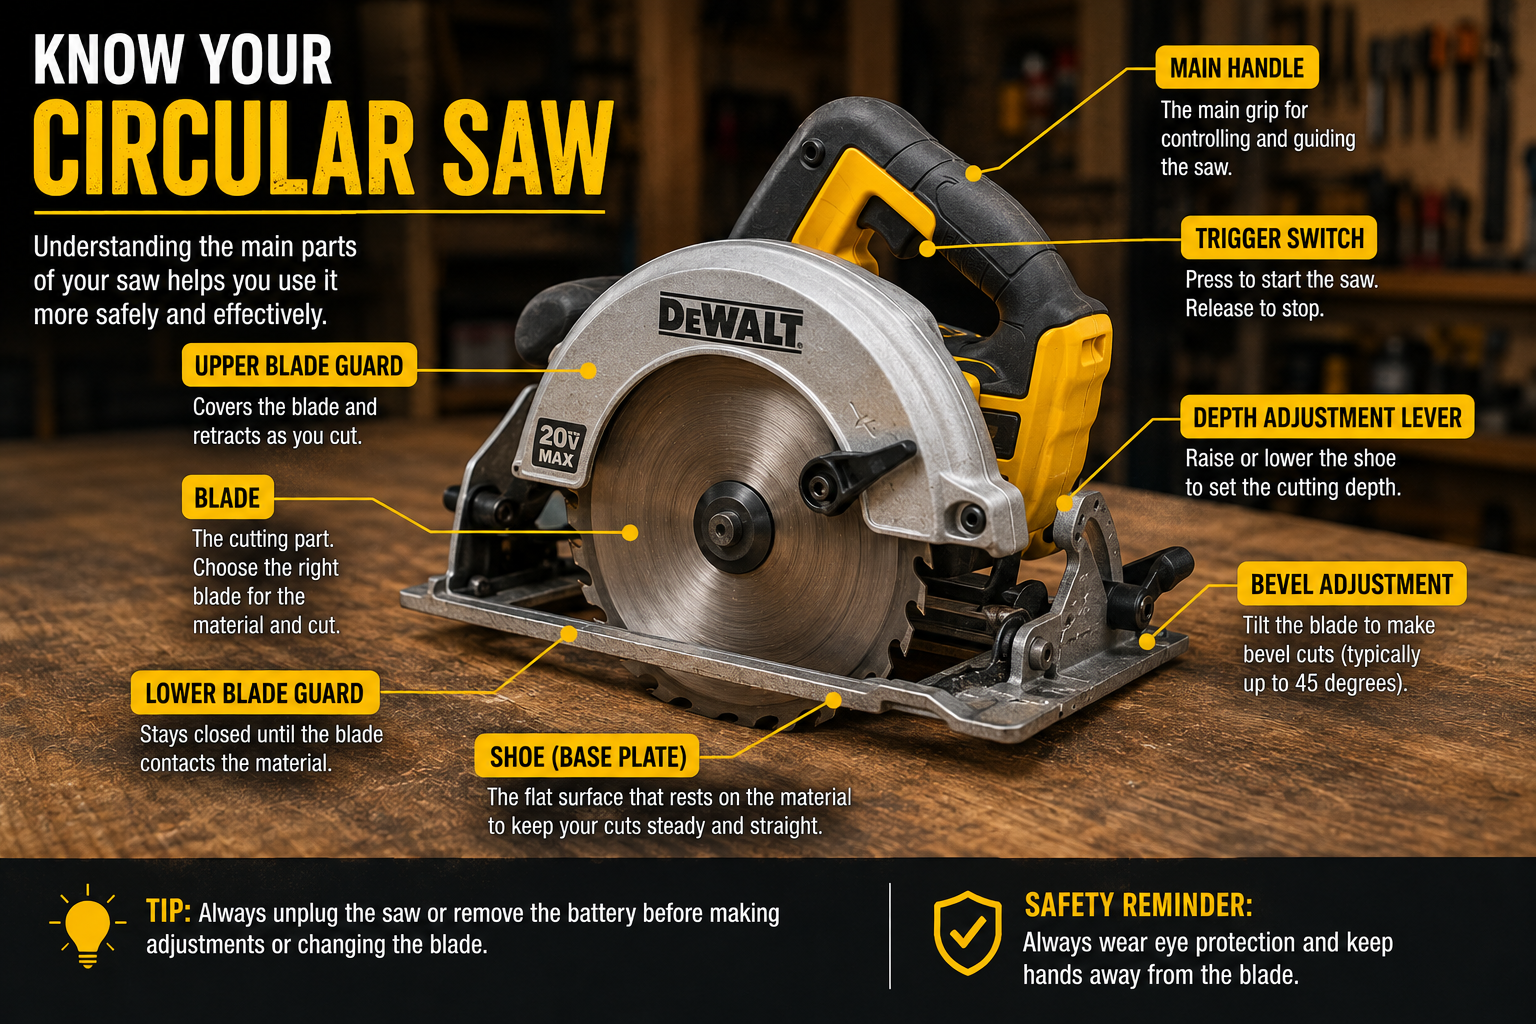
Before making a cut, learn the parts that affect control, accuracy, and safety. Exact controls vary by model, so use your saw’s manual alongside this guide. OSHA’s handheld saw safety guidance is also a useful reference for guarding and portable-saw hazards.
Blade
The circular blade does the cutting. Blade diameter, arbor size, tooth count, and material compatibility must match the saw and the job.
Lower Blade Guard
The spring-loaded lower guard covers the exposed lower portion of the blade when the saw is not cutting and retracts as the saw enters the workpiece. Never tie or wedge it open during normal cutting.
Base Plate
Also called the shoe, the base plate rests on the workpiece and keeps the saw stable. Keep it firmly supported throughout the cut.
Depth Adjustment
This lets you raise or lower the blade relative to the base. Set only the depth needed for the material rather than exposing excessive blade below it.
Bevel Adjustment
The bevel control tilts the base relative to the blade for angled cuts. A standard square cut is normally made at 0°.
Trigger and Lock-Off
The trigger powers the saw. Many models also have a lock-off control that must be operated before the trigger can be pressed.
Cut-Line Guide
Notches or markings at the front of the shoe help align the saw with your cut line. Different markings may apply at 0° and at a bevel.
Battery or Power Cord
Cordless saws use a removable battery; corded models connect to an outlet. Keep a cord positioned well away from the blade and cutting path.
How to Set Up a Circular Saw
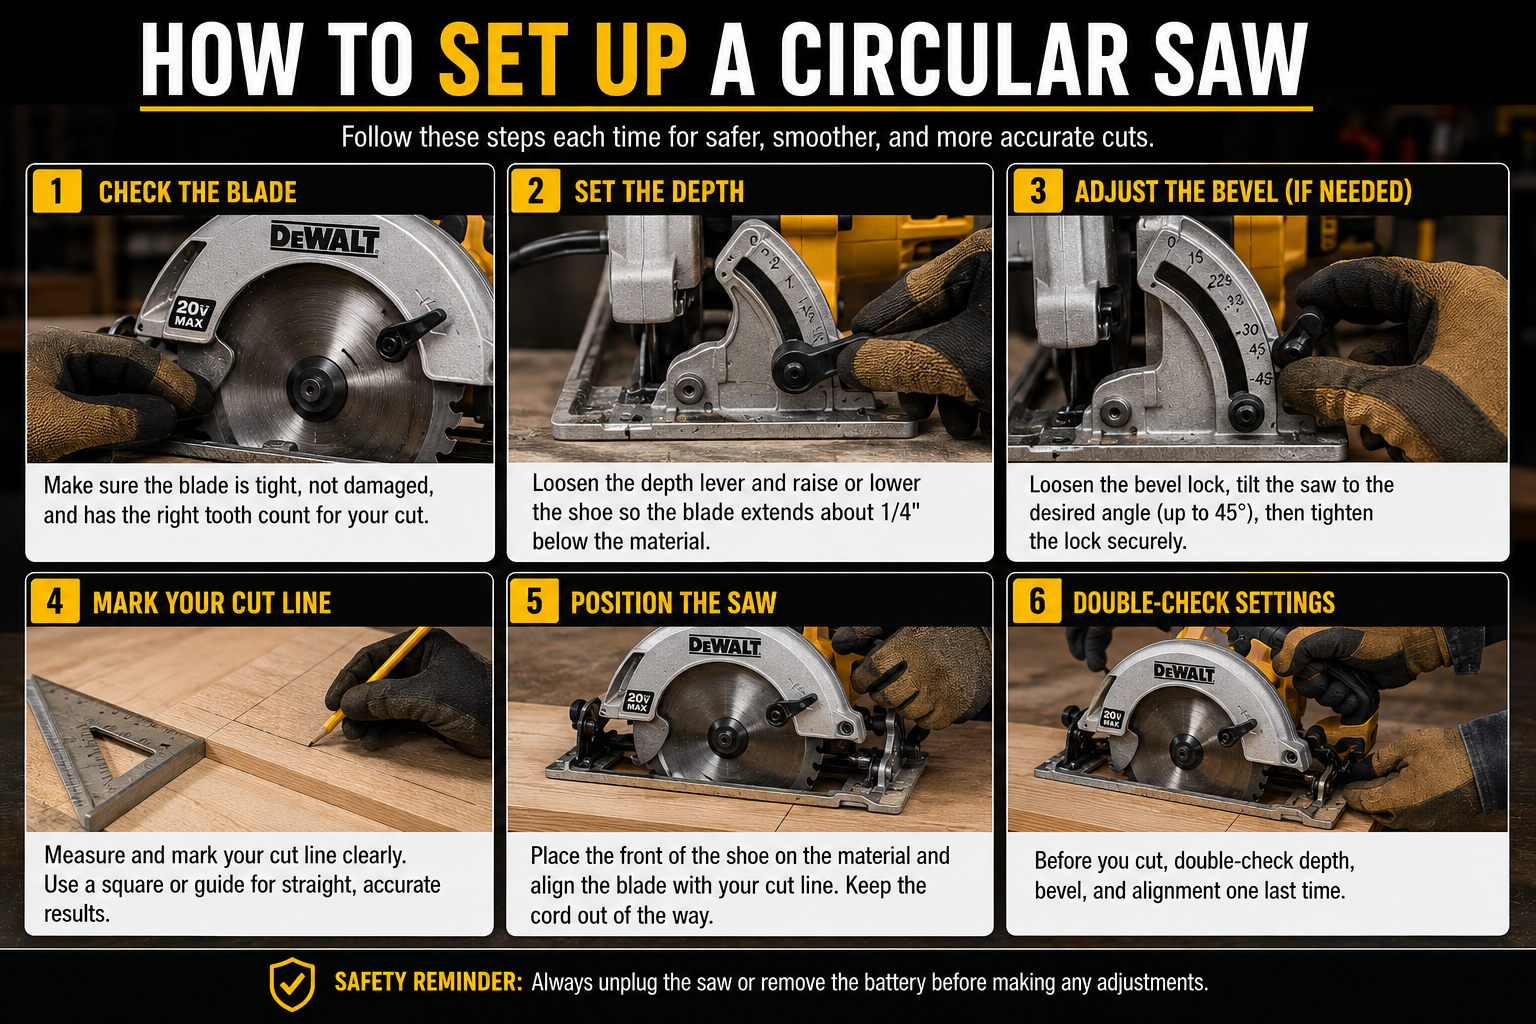
A clean cut begins before the motor starts. Make all blade and depth adjustments with the saw disconnected from power.
Step 1: Choose the Correct Blade
Use a blade approved for your saw and the material you are cutting. Tooth count affects finish as well: blades with more teeth generally produce a finer cut in suitable materials, while lower tooth counts are often used for faster ripping.
Step 2: Disconnect the Power
Remove the battery or unplug a corded saw before changing the blade or making adjustments near it. If you’re replacing the blade, follow our step-by-step guide to changing a circular saw blade safely.
Step 3: Inspect the Blade and Guard
Check that the blade is correctly installed, secure, and free of obvious damage. Make sure the lower guard moves freely and returns on its own.
Step 4: Set the Cutting Depth
Place the saw beside the material and adjust the blade so it projects only slightly below the workpiece. Lock the depth adjustment securely.
Step 5: Set the Bevel
For a normal 90° crosscut or rip cut, set the bevel to 0° and lock it. Change the angle only when the project calls for a bevel cut.
Step 6: Mark the Cut
Measure carefully and draw a clear line. Decide which side is your finished piece and keep the blade kerf on the waste side of the mark.
Step 7: Support the Workpiece
Support and clamp the material so it cannot shift and so the cut-off portion can separate without closing the kerf around the blade. Confirm that the blade has a clear path underneath.
How to Make a Straight Cut With a Circular Saw
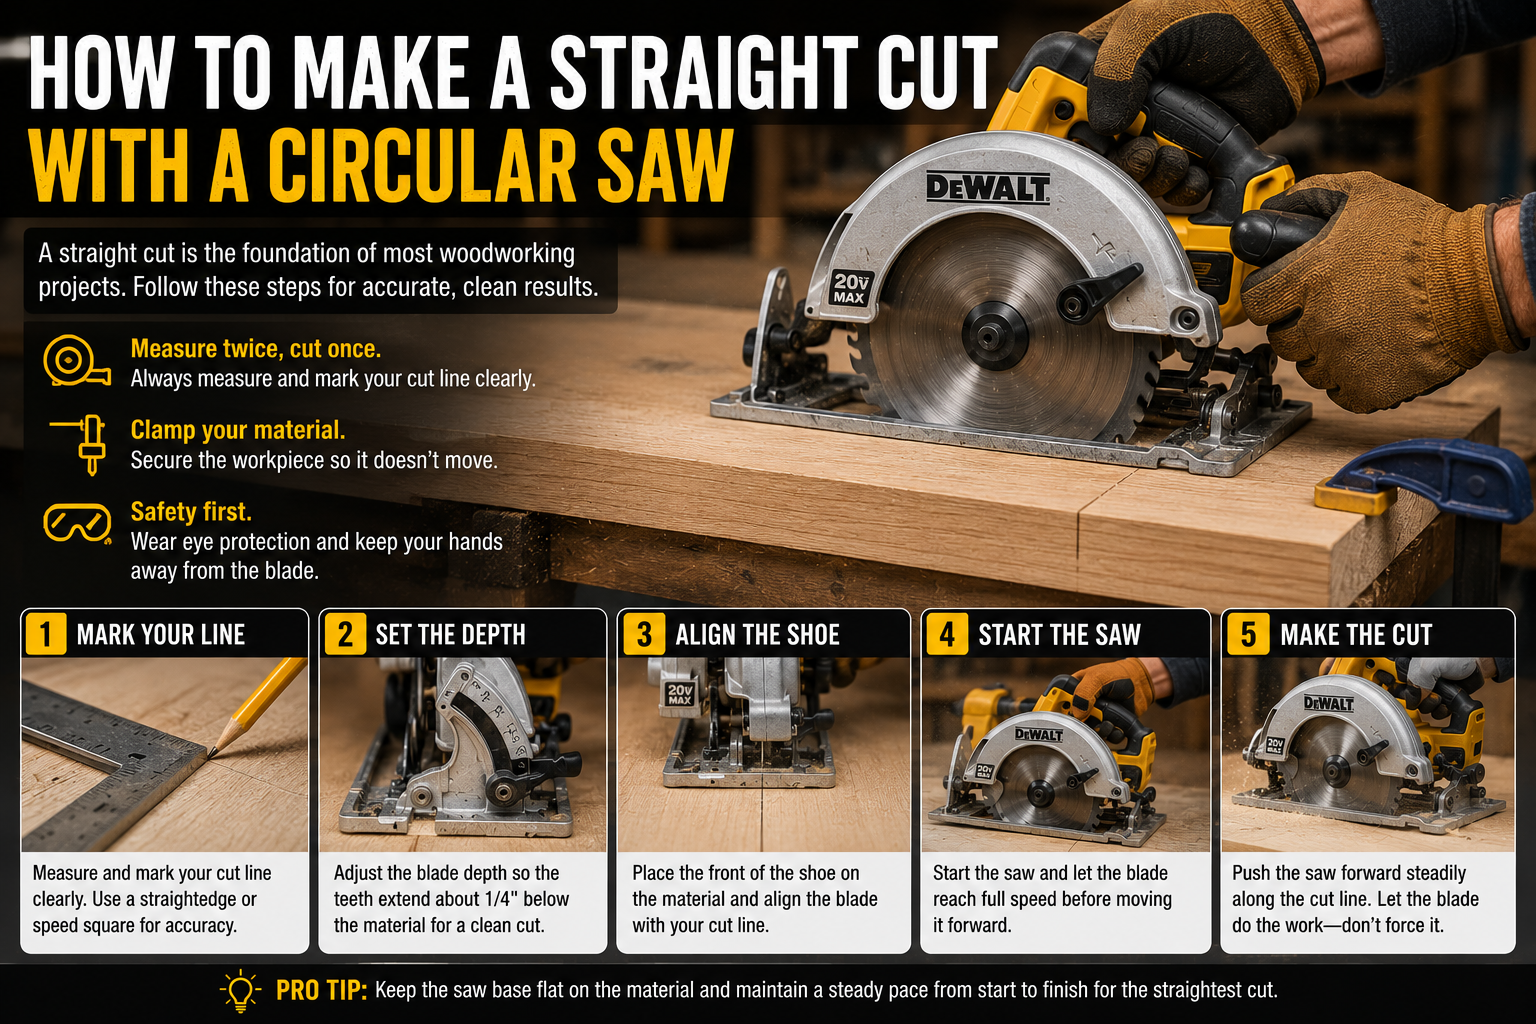
The most important habits are a stable stance, a flat base plate, good alignment, and a smooth feed rate.
Step 1: Position the Saw
Place the front of the base plate on the workpiece while keeping the blade clear of the material. Hold the saw using its designated handles.
Step 2: Align the Cut
Line up the appropriate guide notch with your mark. Remember that the blade removes material, so cut on the waste side when dimension matters.
Step 3: Start the Saw
Operate the lock-off if your model has one, squeeze the trigger, and allow the blade to reach operating speed before it touches the workpiece.
Step 4: Enter the Material Smoothly
Guide the saw forward while keeping the shoe flat. Do not twist the saw as the blade enters the cut.
Step 5: Follow the Line
Maintain a controlled pace and watch the guide rather than trying to rush. Let the blade cut at a rate the saw can comfortably maintain.
Step 6: Finish the Cut
Continue straight until the blade completely exits the workpiece. Release the trigger and maintain control until the blade has stopped and the lower guard has closed before setting the saw down.
How to Make a Bevel Cut
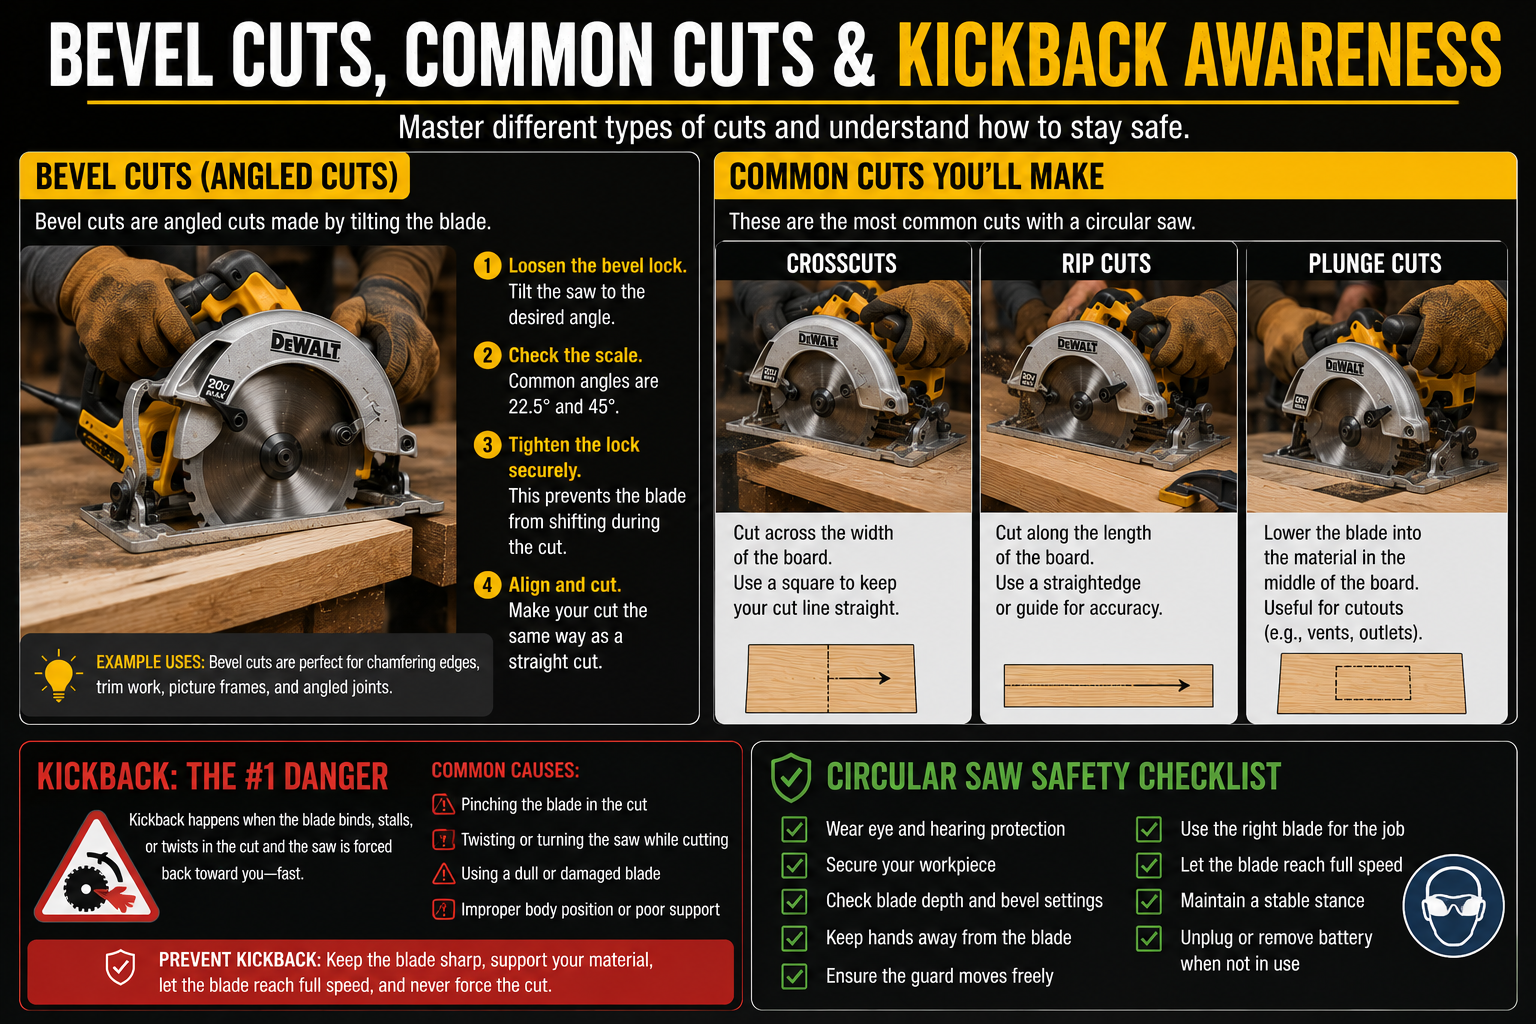
A bevel cut uses the same basic technique, but the saw is tilted relative to the material, which changes its balance and effective cutting depth.
Step 1: Disconnect Power
Remove the battery or unplug the saw before adjusting the bevel.
Step 2: Set and Lock the Angle
Loosen the bevel adjustment, tilt the saw to the required angle, and lock the adjustment securely.
Step 3: Recheck Cutting Depth
Tilting the saw changes how far the blade passes through the workpiece. Confirm that the blade has enough depth for the cut without exposing unnecessary blade.
Step 4: Check Your Alignment Reference
The guide mark used for a 0° cut may not be the correct reference for a bevel. Verify the appropriate indicator on your saw.
Step 5: Make a Controlled Cut
Start with the blade clear, let it reach speed, keep the shoe firmly supported, and guide the saw smoothly without twisting. Practice on scrap first if bevel cutting is new to you.
What Is Circular Saw Kickback?
Kickback is a sudden reaction that can occur when the blade is pinched, binds in the kerf, or the saw is twisted or misaligned while cutting. The saw can move rapidly back toward the operator.
Reduce the risk by supporting the workpiece so the kerf does not close on the blade, using a suitable sharp blade, maintaining alignment, keeping a firm two-handed grip where the saw is designed for it, and never forcing the tool through the material. Position your body to the side of the blade path rather than directly behind it.
If the blade begins to bind or the cut feels uncontrolled, release the trigger and hold the saw securely until the blade stops. Do not try to pull a spinning blade backward out of the cut.
Common Circular Saw Mistakes to Avoid
Setting the Blade Too Deep
Exposing much more blade than the job requires does not improve the cut. Set an appropriate depth for the workpiece.
Poor Workpiece Support
If the material sags or the cut-off piece forces the kerf closed, the blade can bind. Plan the support before cutting.
Starting With the Blade Touching the Material
Begin with the blade clear and allow the motor to reach operating speed before entering the cut.
Forcing the Saw
Aggressive pushing reduces control and can overload the blade or motor. Maintain a steady feed rate instead.
Twisting Mid-Cut
A circular saw is designed to travel straight through the kerf. Trying to steer sharply while the blade is engaged can cause binding.
Ignoring the Blade Guard
Check that the lower guard moves and closes freely. Never defeat the guard to make normal cuts.
Setting the Saw Down While the Blade Is Moving
Keep control after releasing the trigger. Wait for the blade to stop and the guard to close before putting the saw down.
Circular Saw Safety Tips
- Wear eye and hearing protection. Cutting can create chips, dust, and significant noise.
- Keep hands clear of the blade path. Never reach beneath the workpiece while the saw is connected to power.
- Check below the cut. Make sure the blade cannot contact the bench, sawhorse, cable, nails, or other objects.
- Secure the workpiece. Clamp material where appropriate and never hold a small piece in your hand while cutting.
- Manage the cord. On corded saws, keep the cable behind and away from the blade.
- Disconnect power before adjustments. Remove the battery or unplug the saw before blade changes or work near the blade.
- Use appropriate dust precautions. Cutting some materials can create hazardous dust; follow the material and tool manufacturer’s guidance.
- Follow your saw’s manual. Controls, compatible blades, operating limits, and safety procedures vary by model.
Circular Saw vs Other Saws
Choosing a setup for sheet goods? Compare track saws and circular saws, use the plywood saw buying checklist, or read our DeWalt DCS570 review for an existing-platform option.
A circular saw is particularly useful for fast straight cuts in sheet goods and lumber. A jigsaw is usually better when you need curves or tighter maneuverability; our circular saw vs jigsaw comparison explains the difference in detail. If you want to learn that tool next, see our beginner’s guide to using a jigsaw.
For repeated crosscuts and precise angle work at a fixed station, a miter saw can be more convenient. See our miter saw vs circular saw comparison for the trade-offs.
If you are choosing a saw rather than learning one you already own, our best circular saws guide covers our current recommendations.
Frequently Asked Questions
Is a circular saw suitable for beginners?
Yes, provided you learn the controls and safety procedures first. Practice simple straight cuts on scrap material before attempting important project cuts.
How deep should I set a circular saw blade?
Set it so the blade projects only slightly below the workpiece while still providing adequate cutting depth. Follow your saw manufacturer’s guidance for the specific tool and application.
Which side of the line should I cut on?
Keep the blade kerf on the waste side of the line so the material removed by the blade does not reduce the dimension of the finished piece.
Why does my circular saw kick back?
Common causes include a pinched blade, poor material support, twisting the saw in the cut, forcing the tool, or using an unsuitable or damaged blade.
How do I make straighter circular saw cuts?
For long cuts, use a properly clamped straightedge or compatible guide. Accurate marking, good support, and keeping the base plate flat also make a major difference.
Can a circular saw cut materials other than wood?
Some circular saws can cut other materials when equipped with a compatible blade, but suitability depends on the saw, blade, material, and manufacturer instructions. Never assume a wood-cutting setup is safe for another material.
The Pelstro Bottom Line
Good circular-saw technique is mostly about preparation and control: choose the right blade, set the depth correctly, support the material so the blade cannot be pinched, and keep the saw straight with the base plate flat. Start with simple cuts on scrap, use a guide when accuracy matters, and never trade control for speed.
Still choosing a saw? See our Best Circular Saws guide. You can also continue with our How to Use a Jigsaw guide.
Pingback: How to Change a Circular Saw Blade Safely - Pelstro
Pingback: How to Maintain Your Power Tools: A Complete Beginner’s Guide - Pelstro
Pingback: How to Store Power Tools Properly: A Complete Guide - Pelstro